Objectives
Commence an exploration of the Aurelia library by building small app that demonstrates so basic features.
Setup
We first need to install a new tools - the Aurelia Command Line client. This is outlined here:
However, we just need one command:
npm install aurelia-cli -gIn a suitable location create a new project called donation-client:
au new donation-clientaccept all defaults...
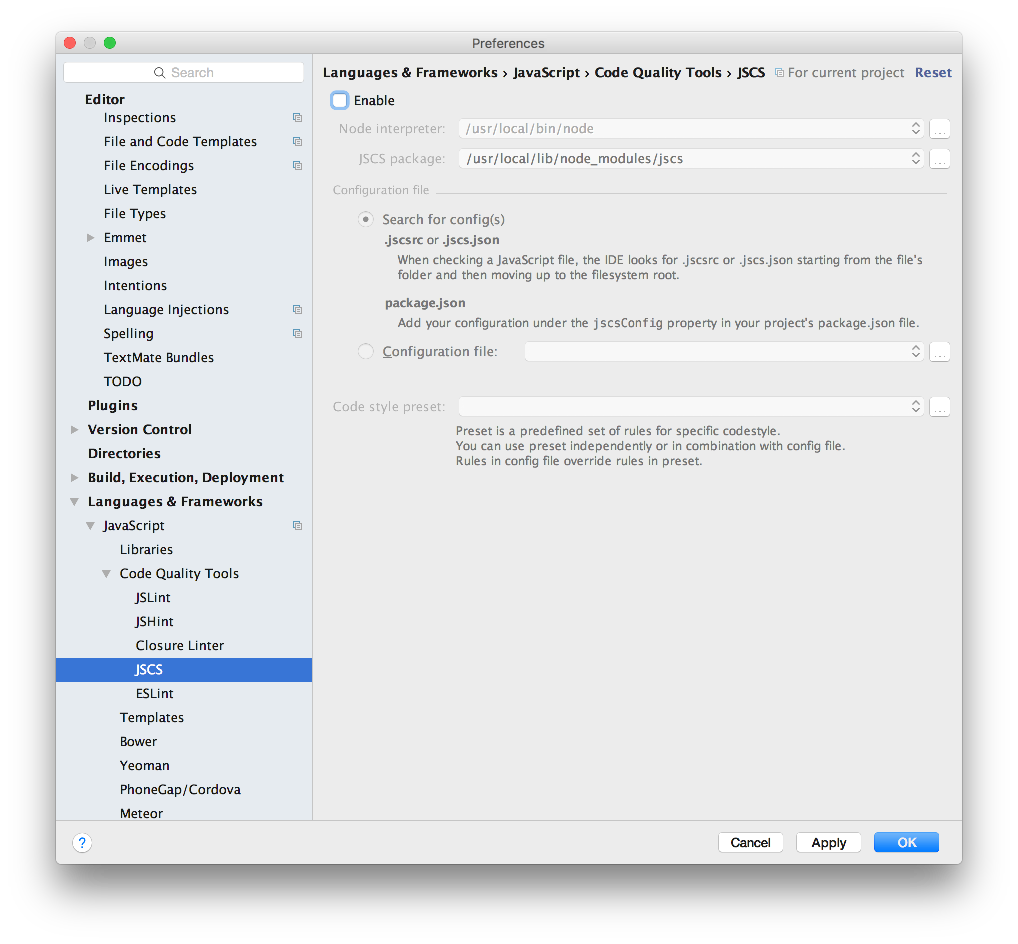
Open in webstorm. You may need to disable jscsrc code quality tools:
and you should enable eslint:
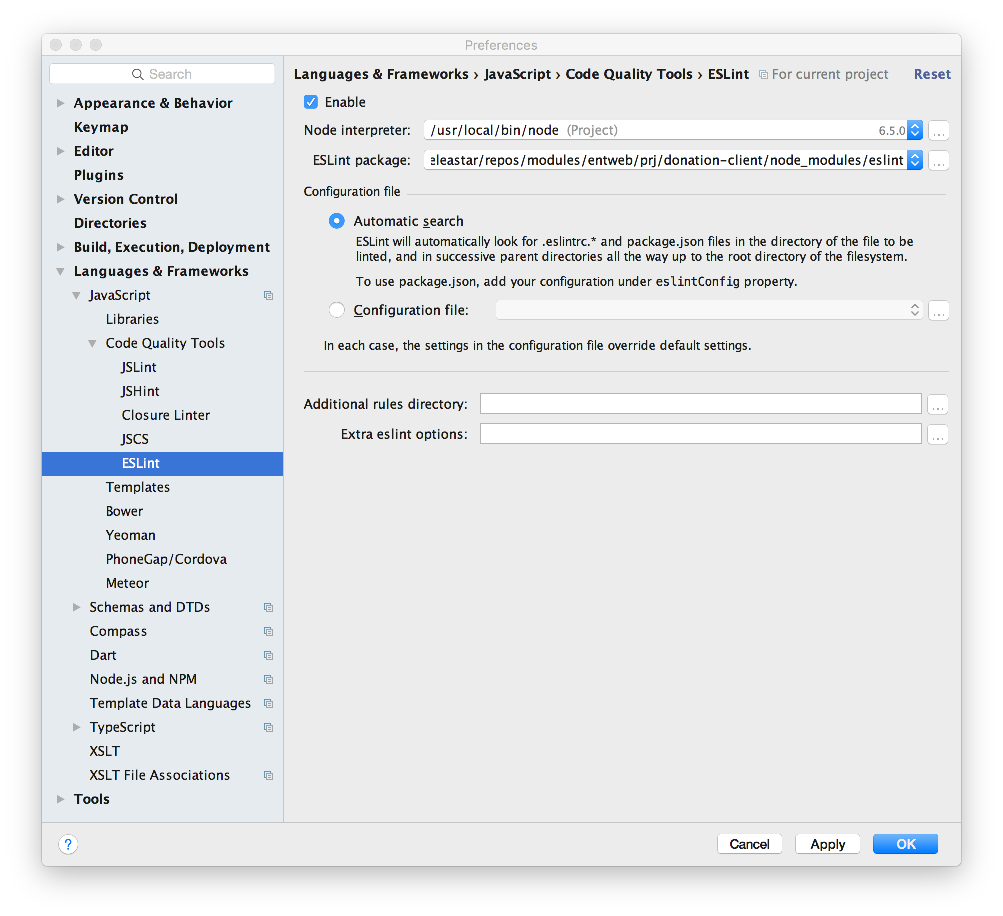
The Eslint rules are built in to the project as generated by the cli.
We need to ammend the gitignore file to exclude generated scripts files:
.gitignore
node_modules
.idea
.DS_STORE
scripts/app-bundle.js
scripts/app-bundle.js.map
scripts/vendor-bundle.js
You can now run the client application via this command:
au run --watchA 'Hello World' app is now being served here:
Assets & Stylesheets
Create a folder in the project root called assets and a subfolder images. Bring in your homer.* set of images from donation-web into this folder.
Edit index.html - also in the root, and include links to the semantic ui stylesheets + js from the usual CDN:
index.html
<!DOCTYPE html>
<html>
  <head>
    <title>Donation</title>
    <meta charset="UTF-8">
    <script type="text/javascript" src="https://cdnjs.cloudflare.com/ajax/libs/jquery/3.1.1/jquery.min.js"></script>
    <script type="text/javascript" src="https://cdnjs.cloudflare.com/ajax/libs/semantic-ui/2.2.4/semantic.min.js"></script>
    <link rel="stylesheet" href="https://cdnjs.cloudflare.com/ajax/libs/semantic-ui/2.2.4/semantic.min.css" type="text/css">
  </head>

  <body aurelia-app="main">
    <script src="scripts/vendor-bundle.js" data-main="aurelia-bootstrapper"></script>
  </body>
</html>
First View/Model
Create a folder in src called viewmodels. Include these new files in this folder:
src/viewmodels/donate.html
<template>
  <section class="ui two column stackable grid basic segment">

    <form submit.trigger="makeDonation()" class="ui form four wide column stacked segment">

      <div class="grouped inline fields">
        <h3>Enter Amount </h3>
        <div class="field">
          <label>Amount</label> <input type="number" value.bind="amount">
        </div>
      </div>
      <button class="ui blue submit button">Donate</button>

    </form>

    <aside class="ui wide twelve wide center aligned middle aligned column">
      <img src="assets/images/homer4.jpeg" class="ui medium image">
    </aside>

  </section>
</template>
src/viewmodels/donate.js
export class Donate {

  amount = 5;

  makeDonation() {
    console.log(`Amount = ${this.amount}`);
  }
}
Now edite src/app.html to include this view/model into the app:
<template>
  <compose view-model="./viewmodels/donate"></compose>
</template>
Browse the app now (make sure it is still running), and a first version of a donation form should be visible. Open the developer tools, so you can see the console log:
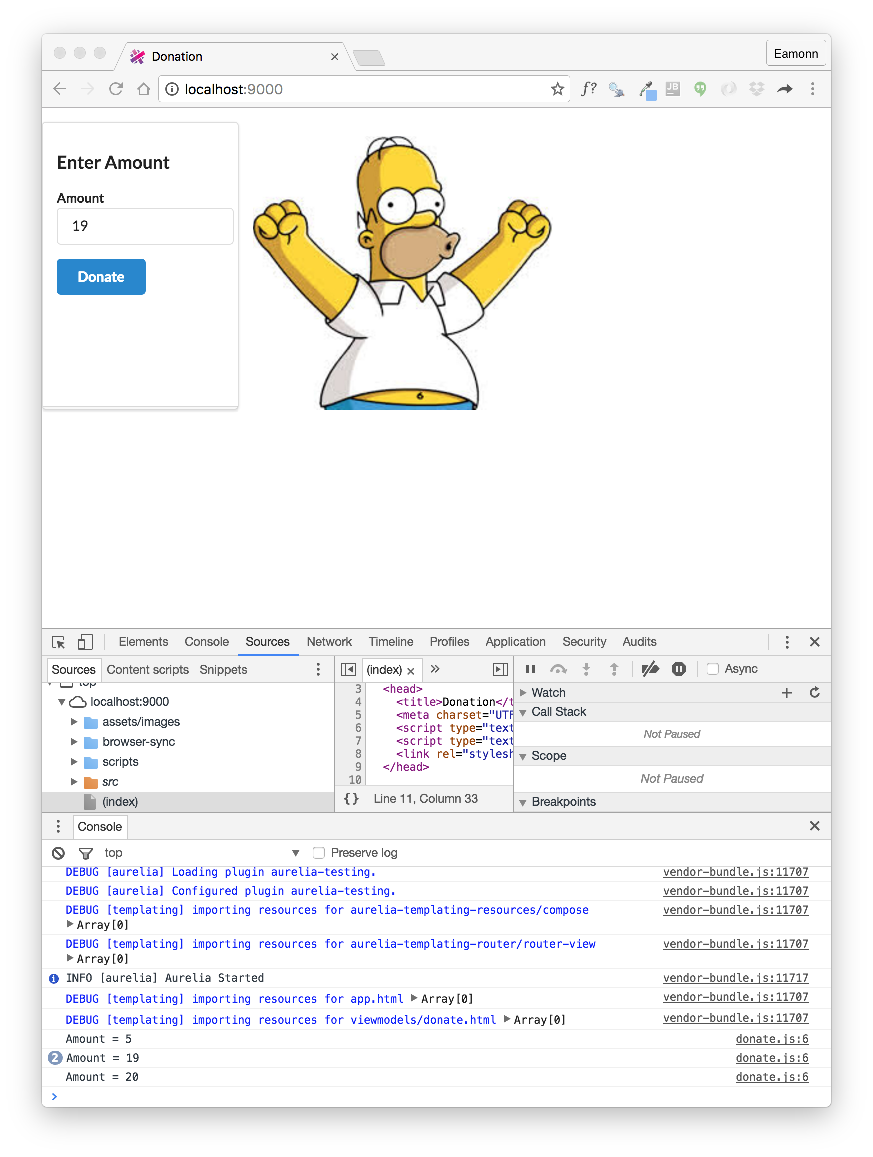
This log should be updated live as you press the donation button.
Binding
In donate.html, introduce a new element to capture the payment method:
src/viewmodels/donate.html
      <div class="grouped inline fields">
        <h3 class="ui dividing header"> Select Method </h3>
        <div class="field" repeat.for="method of methods">
          <div class="ui radio checkbox">
            <input type="radio" model.bind="method" checked.bind="selectedMethod">
            <label>${method}</label>
          </div>
        </div>
        <label class="ui circular label"> ${selectedMethod} </label>
      </div>
Place this just before the submit button element in the form.
Revise the viewmodel class to include extra fields for the bound properties:
export class Donate {

  amount = 5;
  methods = ['Cash', 'PayPal'];
  selectedMethod = 'Cash';

  makeDonation() {
    console.log(`Amount = ${this.amount}`);
    console.log(`Method = ${this.selectedMethod}`);
  }
}
Test the app now - the donation panel should look like this:
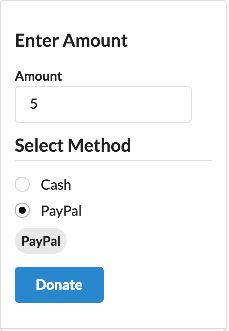
As you press the radio button, note how the on screen label changes. Also, keep an eye on the console log for updates from the event handler.
Now look carefully at the Donate class - notice how simple it is, and how the visual components are automatically bound to the class attributes.
We can continue working on this view with to support a candidate list. First, we define some candidates in the donate class:
src/viewmodels/donate.js
export class Donate {

  amount = 5;
  methods = ['Cash', 'PayPal'];
  selectedMethod = 'Cash';

  candidates = [
    {
      firstName: 'Lisa',
      lastName: 'Simpson'
    },
    {
      firstName: 'Bart',
      lastName: 'Simpson'
    }
  ];
  selectedCandidate = this.candidates[0];

  makeDonation() {
    console.log(`Amount = ${this.amount}`);
    console.log(`Method = ${this.selectedMethod}`);
    console.log(`Candidate = ${this.selectedCandidate.firstName} ${this.selectedCandidate.lastName}`);
  }
}
This is the candidate list view elements:
src/viewmodels/donate.html
      <div class="grouped inline fields">
        <h3 class="ui dividing header"> Select Candidate </h3>
        <div class="field" repeat.for="candidate of candidates">
          <div class="ui radio checkbox">
            <input type="radio" model.bind="candidate" checked.bind="selectedCandidate">
            <label>${candidate.lastName}, ${candidate.firstName}</label>
          </div>
        </div>
        <label class="ui circular label"> ${selectedCandidate.firstName} ${selectedCandidate.lastName}</label>
      </div>
DonationService
Ultimately we will be interacting the donation-web API in this app. In preparation for this, we introduce a class to represent the API in the client. Introduce this class in a new src/services folder:
src/services/donation-service.js
export default class DonationService {

  donations = [];
  methods = ['Cash', 'PayPal'];

  candidates = [
    {
      firstName: 'Lisa',
      lastName: 'Simpson'
    },
    {
      firstName: 'Bart',
      lastName: 'Simpson'
    }
  ];
  selectedCandidate = this.candidates[0];

  donate(amount, method, candidate) {
    let donation = {
      amount: amount,
      method: method,
      candidate: candidate
    };
    this.donations.push(donation);
    console.log(amount + ' donated to ' + candidate.firstName + ' ' + candidate.lastName + ': ' + method);
  }
}
This is a simple class - with no view aspects - that represents the API with a single 'donate' method.
Rewrite the donate view model class now to use this service:
src/viewmodels/donate.js
import {inject} from 'aurelia-framework';
import DonationService from '../services/donation-service';

@inject(DonationService)
export class Donate {

  amount = 0;

  methods = [];
  selectedMethod = '';

  candidates = [];
  selectedCandidate = '';

  constructor(ds) {
    this.donationService = ds;
    this.methods = ds.methods;
    this.selectedMethod = this.methods[0];
    this.candidates = ds.candidates;
    this.selectedCandidate = this.candidates[0];
  }

  makeDonation() {
    this.donationService.donate(this.amount, this.selectedMethod, this.selectedCandidate);
  }
}
We are using Aurelia Dependency Injection to locate a references to the service object, and in our constructor we are binding the visual components directly to service data structures.
This should now be running as before - there is no change to the html template.
Fixtures
To keep the donation-service class clean, we can load candidates and methods (and sample donations) from an external file.
src/services/fixtures.js
export default class Fixtures {

  methods = ['Cash', 'PayPal'];

  candidates = [
    {
      firstName: 'Lisa',
      lastName: 'Simpson'
    },
    {
      firstName: 'Bart',
      lastName: 'Simpson'
    }
  ];

  donations = [
    {
      amount: 23,
      method: 'cash',
      candidate: this.candidates[0]
    },
    {
      amount: 212,
      method: 'paypal',
      candidate: this.candidates[1]
    }
  ];
}
This is a refactored donation-service to load this data:
import {inject} from 'aurelia-framework';
import Fixtures from './fixtures';

@inject(Fixtures)
export default class DonationService {

  donations = [];
  methods = [];
  candidates = [];

  constructor(data) {
    this.donations = data.donations;
    this.candidates = data.candidates;
    this.methods = data.methods;
  }

  donate(amount, method, candidate) {
    const donation = {
      amount: amount,
      method: method,
      candidate: candidate
    };
    this.donations.push(donation);
    console.log(amount + ' donated to ' + candidate.firstName + ' ' + candidate.lastName + ': ' + method);
  }
}
All should work as before.
Report
Introduce the following viewmodel + template pair to render the list of donations:
src/viewmodels/report.js
import {inject} from 'aurelia-framework';
import DonationService from '../services/donation-service';

@inject(DonationService)
export class Report {

  donations = [];

  constructor(ds) {
    this.donationService = ds;
    this.donations = this.donationService.donations;
  }
}
src/viewmodels/report.html
<template>

  <section class="ui stacked segment">
    <article class="eight wide column">
      <table class="ui celled table segment">
        <thead>
          <tr>
            <th>Amount</th>
            <th>Method donated</th>
            <th>Candidate</th>
          </tr>
        </thead>
        <tbody>
          <tr repeat.for="donation of donations">
            <td> ${donation.amount}</td>
            <td> ${donation.method}</td>
            <td> ${donation.candidate.lastName}, ${donation.candidate.firstName}</td>
          </tr>
        </tbody>
      </table>
    </article>
  </section>

</template>
Change src/app.html to include this viewmodel instead:
src/app.html
<template>
  <compose view-model="./viewmodels/report"></compose>
</template>
The table should render - with the sample data we loaded from the fixture:

Viewmodel Composition
We would like to display both viewmodels on the same page, and explore how databinding works in practice.
First, simplify donate.html by removing the image and simplifying the layout slightly:
src/viewmodels/donate.html
<template>
  <section class="ui two column stackable grid basic segment">

    <form submit.trigger="makeDonation()" class="ui form  column stacked segment">

      <div class="grouped inline fields">
        <h3>Enter Amount </h3>
        <div class="field">
          <label>Amount</label> <input type="number" value.bind="amount">
        </div>
      </div>

      <div class="grouped inline fields">
        <h3 class="ui dividing header"> Select Method </h3>
        <div class="field" repeat.for="method of methods">
          <div class="ui radio checkbox">
            <input type="radio" model.bind="method" checked.bind="selectedMethod">
            <label>${method}</label>
          </div>
        </div>
        <label class="ui circular label"> ${selectedMethod} </label>
      </div>

      <div class="grouped inline fields">
        <h3 class="ui dividing header"> Select Candidate </h3>
        <div class="field" repeat.for="candidate of candidates">
          <div class="ui radio checkbox">
            <input type="radio" model.bind="candidate" checked.bind="selectedCandidate">
            <label>${candidate.lastName}, ${candidate.firstName}</label>
          </div>
        </div>
        <label class="ui circular label"> ${selectedCandidate.firstName} ${selectedCandidate.lastName}</label>
      </div>

      <button class="ui blue submit button">Donate</button>

    </form>

  </section>
</template>
Now we can replace the current app.html with a version that composes a view from the two viewmodels:
src/app.html
<template>

  <section class="ui two column stackable grid basic center aligned segment">
    <aside class="column">
      <compose view-model="./viewmodels/donate"></compose>
    </aside>
    <article class="column">
      <compose view-model="./viewmodels/report"></compose>
    </article>
  </section>

</template>
The app should now render like this:
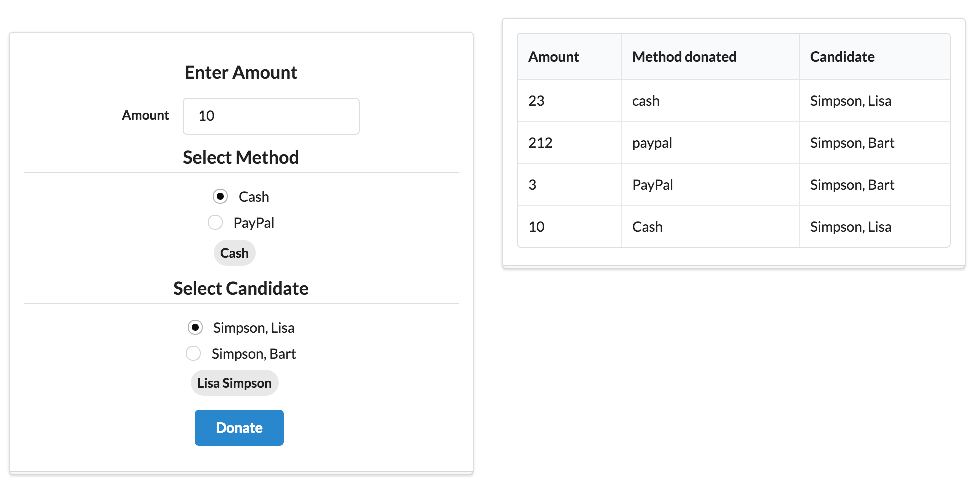
The nature of databinding in the app now is such that the donation list view is automatically synchronised with the donate view model. Try it now, and confirm that the report view will be expanded as you make donations.
Exercises
Archive of the lab so far:
Exercise 1: Simplified Layouts
Here are revisions to the current layouts, which simplify them marginally:
src/app.html
<template>

  <div class="ui container">
    <section class="ui three column stackable grid basic segment">
      <div class="ui row">
        <aside class="column">
          <compose view-model="./viewmodels/donate"></compose>
        </aside>
        <article class="column">
          <compose view-model="./viewmodels/report"></compose>
        </article>
      </div>
    </section>
  </div>

</template>
src/templates/donate.html
<template>

    <form submit.trigger="makeDonation()" class="ui form stacked segment">

      <h3 class='ui dividing header'> Make a Donation </h3>
      <div class="grouped inline fields">
        <div class="field">
          <label>Amount</label> <input type="number" value.bind="amount">
        </div>
      </div>

      <h4 class="ui dividing header"> Select Method </h4>
      <div class="grouped inline fields">

        <div class="field" repeat.for="method of methods">
          <div class="ui radio checkbox">
            <input type="radio" model.bind="method" checked.bind="selectedMethod">
            <label>${method}</label>
          </div>
        </div>
        <label class="ui circular label"> ${selectedMethod} </label>
      </div>

      <h4 class="ui dividing header"> Select Candidate </h4>
      <div class="grouped inline fields">
        <div class="field" repeat.for="candidate of candidates">
          <div class="ui radio checkbox">
            <input type="radio" model.bind="candidate" checked.bind="selectedCandidate">
            <label>${candidate.lastName}, ${candidate.firstName}</label>
          </div>
        </div>
        <label class="ui circular label"> ${selectedCandidate.firstName} ${selectedCandidate.lastName}</label>
      </div>

      <button class="ui blue submit button">Donate</button>

    </form>

</template>
src/templates/report.html
<template>

  <article class="ui stacked segment">
    <h3 class='ui dividing header'> Donations to Date </h3>
    <table class="ui celled table segment">
      <thead>
        <tr>
          <th>Amount</th>
          <th>Method donated</th>
          <th>Candidate</th>
        </tr>
      </thead>
      <tbody>
        <tr repeat.for="donation of donations">
          <td> ${donation.amount}</td>
          <td> ${donation.method}</td>
          <td> ${donation.candidate.lastName}, ${donation.candidate.firstName}</td>
        </tr>
      </tbody>
    </table>
  </article>

</template>
Include them now and verify that they layouts perform as expected.
Candidates ViewModel
We need a new viewmodel + template to enable a user to add a candidate to the election.
Here is the layout:
src/layouts/candidates.html
<template>

  <form submit.trigger="addCandidate()" class="ui form stacked segment">
    <h3 class="ui dividing header"> Add a Candidate </h3>
    <div class="field">
      <label>First Name </label> <input value.bind="firstName">
    </div>
    <div class="field">
      <label>Last Name </label> <input value.bind="lastName">
    </div>
    <div class="field">
      <label>Office </label> <input value.bind="office">
    </div>
    <button class="ui blue submit button">Add</button>
  </form>

</template>
.. and here is the (incomplete) viewmodel:
export class Candidate {

}
Using the donation viewmodel as a guide, see if you can implement this viewmodel.
HINT: Your objective should be to read the firstname, lastname and office from the view and invoke a new addCandidate method on donationService. This should push a new candidate onto the candidates array it is managing. You will also need to include this viewmodel in app.html so that it will display (just create a new column);